Lighting and compositing for live action, as most people know, are big issues in today's entertainment business. Many films that come out today employ the use of CG and in some cases not even for fantastical action like the massive explosions or exaggerated action on land and in space as featured in two of my favorite films: The Avengers (2012) and Star Trek (2009).
And yes you could say these films might have predictable action or plot holes and science fail (I'm looking at you Star Trek), but what those two movies have that make them work are: enjoyable (quippy) characters, decent plot lines, and near seamless CG that works, both in the context of the story line and in it's design, to draw the viewer in.
I could go on an on about the importance of character and plot in any story but that's not what this post is about - in fact it's about CG in the "real world" and how it can make or break a film.
In fact I found this article : (
click here) online about the "Top Ten Otherwise Promising Movies Ruined by CGI." I won't lie, some of the films it listed I never even bothered to see either because of the film's terrible reviews or lack of interest. Though I do have to disagree about the author's inclusion of the Mummy Returns (the second film in the Mummy trilogy starting in 1999). If anything the Tomb of the Emperor (2008) was the thing to kill the series (though thankfully not my love of the first and second films). And before I digress I just want to say I don't even know what to think about the reboot! (
For more on the Mummy reboot click here.)
The point of my many ramblings and ravings is to emphasize the importance of quality when composing anything that will incorporate both real and computerized elements.

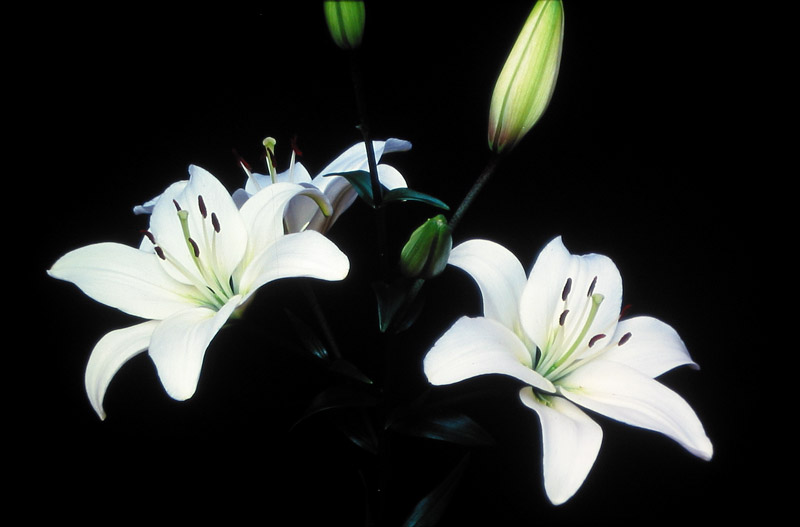
However before we jump into live action, I think it's much easier to start to learn to deal with a still frame image. After all amazing work like the photo on the left, which uses both photography and CGI, is worth putting the effort into. (
click here for article about how this image was made!)
Thinking about lighting and compositing (and reboots in general) made me look through my own work. To be honest I've never done much by way of combining CGI and live action, in fact the majority of my works are either entirely computer generated or entirely live action.
There is one project however I did a few months back for a class I took on lighting. The project was small to be honest and it's main focus was just getting us to test the waters in terms of matching up our CG objects to the lights and shadows in a photograph, while also learning about setting up and using render layers in Maya & Photoshop. In the end this is what I came up with:
I'm certain you can spot the CG elements in my photo but (in case your eye-sight is poor) I'll tell you that in this photo I took of a corner in a local coffee shop, I created the vase and flower and coffee cup in Maya and placed them on the otherwise empty table. As proof here is my original image:
To render out and combine the different layers (shadow, diffuse, and specular maps) I used the programs Maya and Photoshop.
As you can see from the first image, my results were not perfect nor entirely convincing.
This is because when I worked on the project I was too focused on getting a nice and usable image to work with, since getting one from the internet seemed too risky in terms of image quality, and trying to set up the layers to render correctly so that they were laid out nicely (and didn't block out other parts of my scene) when I started to composite in Photoshop.
I was so focused that I'll admit I know I hardly cared about
what I actually put into the scene, which is not a good habit nor a good idea when creating
anything of quality in any art field.
So in the spirit of learning good compositing over the next several weeks I'm going to begin to improve upon this project, first by working with the elements already in the scene. It would be nice to add some dirt or adjust the shading/materials on the objects making them appear more realistic.
It might also help to soften the shadows and adjust my render layers so that when I composite them in Photoshop the resulting colors of the entire photograph don't become more dull and instead stay as vibrant as in the original.
Once that is done I can move on to adding more objects to the scene. So far I'm thinking maybe a notebook and a little figurine on the back table to start with but I'll have time in the next few weeks to consider what might work better.
For now at least I'm excited to dive back into a project I enjoyed despite it's frustrations, and of course there'll be more on my project's progress later. Please let me know if you have any suggestions or questions!
-Shanna May
Scroll to Top